|
|
| Home | Mac App Store | Help | |
| Welcome to RustyKat website! | Music and audio software for creative Mac users. |
|
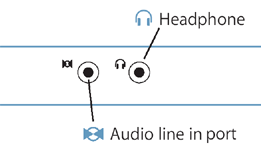
Laidman & Katsura Vintage Series Tuners Getting Started There is nothing like playing perfectly in tune! Laidman & Katsura thank you for your interest in our products. We have an entire line of tuning products, and we hope that one will suit your needs. Let's use Guitar Tuner, from our "Vintage" series, to introduce these virtual devices for Macintosh. Requirements: Mac OS X 10.9 or later. Audio input device such as a built-in microphone and a USB audio interface. Inspect the Volume Indicator Talk or play something while watching the volume indicator. Several green bars (4-7) should appear then vanish again. If no green bars appear, too few bars, or the red bar appears often, please read the section entitled, 'Selecting the Microphone'. Inspect the Tracking Indicator Sing or play a note and hold it. The tracking indicator (orange horizontal bar) should advance steadily while you hold the note. The tracking indicator advances one (very small) unit every time a successful pitch determination is made. A smooth procession indicates great success! Now you're ready to tune! That's how easy it is to use all the Laidman & Katsura software tuners. Your results should be nothing short of spectacular! If you're having trouble or feel your results are less than ideal, please read the sections entitled, 'Selecting the Microphone', and 'Best Results' Selecting the Microphone Laidman & Katsura tuning programs work by 'listening' through your Microphone. Because your Mac may support more than one sound input device (Microphone, Line Input, etc.) you may need to choose one. From the Tuner Microphone Menu, select "Configure..." and then choose a device for sound input; generally this will be 'Internal microphone'. You may also be able to use 'Line In' for direct instrument connections, such as a guitar or keyboard. Verify that the Input level indicator is active. As you talk (or play) the bars should light up and vanish again. Adjust the Input volume slider so that most of the bars light up when you talk the loudest. (You don't want all the bars to light up, just most of them, then you know you have the Input level set correctly.) Best Results Once you're certain the Microphone is working, here is how you can obtain best results... Place the microphone near you, or position yourself near the microphone. The microphone should generally be located as near to the sound source as possible. However, singing too close too a microphone may create "popping" effects. A good starting point is about 2 feet distance. A little experimentation may improve results. Avoid handling the microphone because it introduces rattling noises. If you have an external microphone, try making contact between the microphone and instrument. For example, when using a guitar, place the microphone on your leg and gently rest the guitar on top of the Mic. When singing, hold the microphone to your neck, near the vocal chords. Direct Audio Connections Instead of using the internal Microphone on your Macintosh, you may use an external microphone connected to your computer's Audio line in port. If your computer does not have an internal microphone or Audio line in port, you can purchase a low-cost third party device such as the iMic USB Audio system. Connecting an electronic instrument directly to the Audio line in port will achieve better results than using a microphone because 'ambient' noise is eliminated. Typical instruments that you might connect are Electronic Keyboard and Guitar. You may need a cable adaptor to make this connection. Use either Line output or Headphone output of your instrument. If your electronic instrument or external microphone produces a very low signal, such as an unamplified electric guitar or external microphone, you can use the iMic USB audio system as a 'pre-amp'. Whenever you connect an electronic instrument to your computer, be sure to set the output level (volume) appropriately. Begin with the volume level of the instrument turned all the way down, then turn it up slowly while watching the level indicator in the Sound Input control panel. With the input level slider all the way to the right in the Sound Input Control panel, the volume level of your instrument should just peak the meter. CAUTION: Never use an electronic device that exceeds 'line level' which is a standard for audio equipment. Advanced - Audio Midi Setup Utility (Optional) Advanced Users may find additional configuration items using the Audio-Midi Setup Utility included with your Mac. Here you may choose the 'Thru' item to monitor the input device through speakers or headphones. One Note Only! The pitch detection algorithm can only detect one note at a time! It cannot distinguish individual notes among chords. When using an instrument capable of producing more than one note, avoid notes which continue to sound after a new note is introduced. For example, avoid the sustain pedal when playing the piano, or open strings on a guitar. Also avoid reverb and echo effects. Avoid background noise when using a Microphone. Common sources of background noise include talking, television, and air conditioner. Preferences Individual tuners may have their own set of Preferences. Here are typical setting and what they mean... A=440 This preference setting determines the 'A' reference. By convention, 'A' is typically set at 440Hz. However, there may be situations where you want to tune slightly higher or lower. Changing the 'A' reference effectively shifts the entire tuning spectrum, so that all notes will be in tune with the reference you enter. Close Enough for Rock 'n Roll This setting makes it slightly easier to get an 'in tune' indication. This does not affect the operation of the pitch-detection algorithm, only the visual indication of when you are 'in tune'. Guitar Tuner, for example, changes the needle color to represent 'in tune'. Octave Jump Rejection This setting is used primarily for guitars, and should normally be unchecked. The lower strings on some guitars my produce an octave jump upon striking the string (a natural phenomenon, not a flaw in pitch detection) This can be distracting when trying to tune, so Guitar Tuner provides this option to mask octave jumps. Tip: If the low E string still jumps, play an A (5th fret) on the low E string and tune to the A on the Guitar Tuner display. |
|
Copyright © 1993-2003 Rustle Laidman, Copyright © 2004-2026 Laidman & Katsura. All rights reserved. |